
In today's visually-driven real estate market, the quality of your listing photos can make or break a potential sale. Buyers form their first, and often final, impression of a property based almost entirely on its online presentation. High-quality images do not just showcase a space; they create an emotional connection, build perceived value, and drive qualified traffic directly to your listings.
Industry reports consistently show that listings with professional photos sell 32% faster and can command a significantly higher sale price. This isn't about simply documenting rooms; it is a critical component of strategic marketing. A poorly shot photo can make a spacious room feel cramped, a bright home look dreary, and an expensive feature seem insignificant. Conversely, a well-executed image tells a story, highlights a home's best assets, and helps potential buyers envision themselves living there.
This guide provides ten essential realty photography tips that move beyond the basics, offering actionable techniques for agents who want to compete and win in a crowded marketplace. We will cover everything from mastering natural light and composition to leveraging powerful AI tools for instant virtual staging and decluttering. You will learn specific methods for post-processing, creating a compelling photo narrative, and optimizing your images for the MLS.
These insights will equip you to create compelling visual narratives that capture buyer attention and get properties sold faster. Whether you are a seasoned professional looking to refine your technique or a new agent aiming to establish a strong brand, implementing these strategies will fundamentally improve how your listings perform online and offline. Let's dive into the techniques that turn browsers into buyers.
1. Optimize Natural Lighting for Maximum Appeal
Natural light is your most powerful and cost-effective tool in real estate photography. It breathes life into a space, making it feel larger, cleaner, and more welcoming. Unlike artificial lighting, which can cast unnatural yellow or blue tints, sunlight provides a full, balanced spectrum that reveals true colors and textures. Mastering natural light is a fundamental realty photography tip that can dramatically elevate your listings.
Timing is Everything: Shoot by the Sun's Schedule
The quality and direction of sunlight change dramatically throughout the day, directly impacting the mood of your photos.
- Golden Hour: The period shortly after sunrise and before sunset is prized for its soft, warm, and directional light. This flattering glow minimizes harsh shadows and creates an inviting, aspirational atmosphere. Schedule exterior shots during this time to capture a home at its most beautiful.
- Mid-Day Light: While often considered harsh for exteriors, bright mid-day sun can be perfect for illuminating interior spaces, especially those with smaller windows. The high angle of the sun can flood rooms with bright, energizing light.
Leverage a Room's Orientation
Understanding how a home is oriented is crucial for planning your shoot.
- North-Facing Rooms: These rooms receive soft, indirect light all day. This consistent, diffused lighting is easy to work with and prevents harsh highlights or deep shadows, making it ideal for creating a calm and even look.
- South-Facing Rooms: These spaces get intense, direct sunlight, especially in the winter. This can create beautiful, bright images but also poses challenges with high contrast. Use sheer curtains to diffuse the light or plan your shoot for when the sun isn't shining directly through the windows.
- East/West-Facing Rooms: Shoot east-facing rooms in the morning and west-facing rooms in the afternoon to capture the best direct light.
Pro Tip: Use a compass app on your phone to determine the orientation of each key room before the shoot. This allows you to create a precise schedule to capture every space in its ideal lighting conditions.
Properly lit interiors showcase a home's potential and create an emotional connection with buyers. Understanding how to effectively put your living room in the best light is crucial for maximizing appeal and ensuring your photos truly shine.
2. Master Wide-Angle Lens Photography and Distortion Correction
A wide-angle lens is a non-negotiable tool in any real estate photographer's kit. Lenses in the 14-24mm range are essential for capturing the full scope of a room, making spaces feel expansive, open, and impressive to potential buyers. However, this powerful tool comes with a common challenge: perspective distortion, which can warp straight lines and create an unnatural, curved look. Mastering the use of these lenses and knowing how to correct distortion are crucial realty photography tips for producing professional, high-impact images.
Finding the Sweet Spot: Focal Length and Positioning
Choosing the right focal length and camera position is key to balancing a spacious feel with a natural look. Going too wide can distort reality, while not going wide enough can make a room feel cramped.
- Optimal Focal Length: For most interior rooms, a focal length between 18-24mm provides the ideal balance. This range is wide enough to showcase the entire space without the extreme distortion often seen at 14mm or 16mm. Top listings on platforms like Zillow and Trulia often utilize shots within this professional-standard range.
- Camera Height: Position your camera at a standing eye level, typically around 5 to 5.5 feet from the floor. This height creates a natural, relatable perspective, as if the viewer is standing in the room themselves. Avoid shooting from too low or too high, which can skew the room’s proportions.
Keeping It Straight: The Importance of Leveling
The most common mistake with wide-angle lenses is failing to keep the camera perfectly level. Even a slight tilt can cause vertical lines, like walls and door frames, to appear as if they are falling backward or converging, a distracting effect known as "keystoning."
- Use a Tripod: A sturdy tripod is non-negotiable. It ensures your camera remains stable and perfectly positioned.
- Engage the Bubble Level: Your tripod head should have a built-in bubble level. Use it to ensure your camera is perfectly level both horizontally and vertically before every single shot.
- Focus on Verticals: Pay close attention to the vertical lines in your composition. Make sure walls, windows, and doorways are perfectly straight up and down in your viewfinder.
Pro Tip: When shooting, avoid placing important objects like furniture too close to the edges of the frame. This is where lens distortion is most pronounced. Keeping key elements closer to the center will result in a more natural and appealing photograph.
Even with perfect technique, some minor distortion may remain. This is where post-processing software like Adobe Lightroom or Photoshop becomes invaluable. Their built-in lens correction tools can automatically detect your lens and apply a profile to instantly fix any residual warping, ensuring your final images are polished and professional.
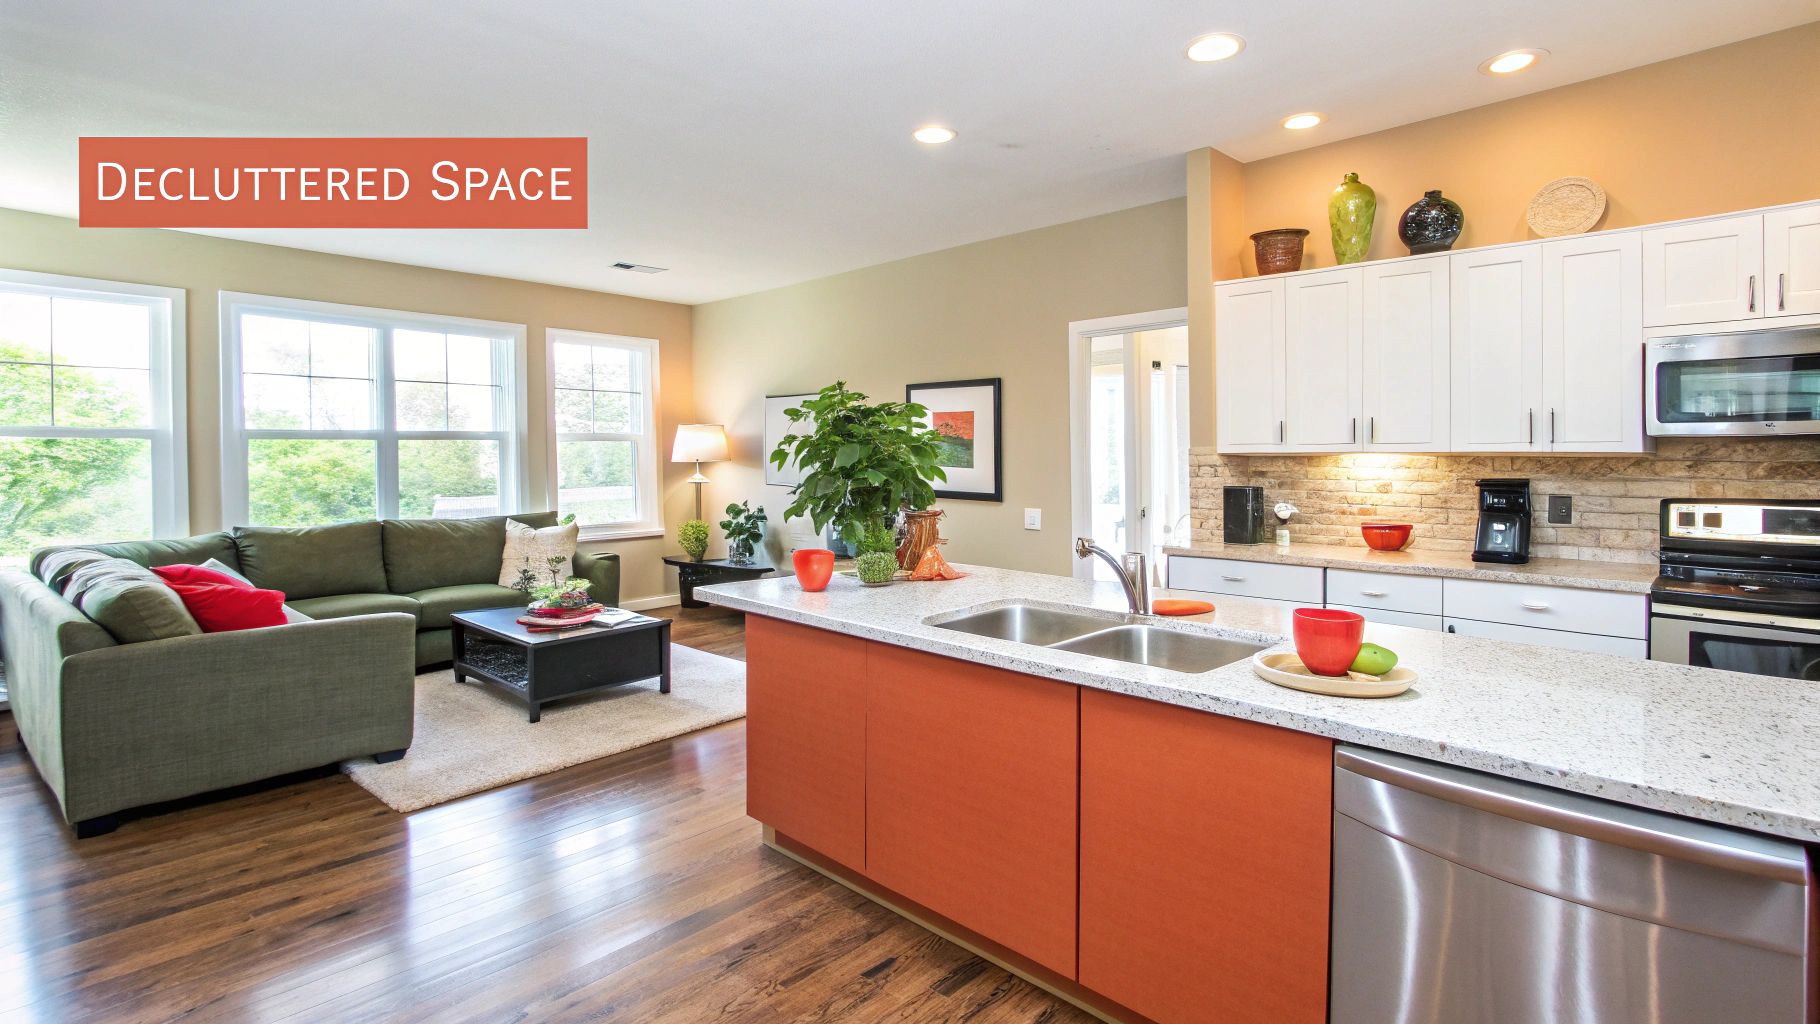
3. Stage and Declutter Spaces for Maximum Visual Impact
A photograph captures a moment, but a great real estate photograph sells a vision. Strategic staging and decluttering are essential realty photography tips because they remove the seller's personal story, allowing potential buyers to mentally move in. By curating a neutral, inviting, and spacious environment, you transform a lived-in house into a desirable product that appeals to the broadest possible audience.
Depersonalize to Universalize
The core principle of staging is to help buyers envision the property as their own, not as someone else's current home. This requires a deliberate process of neutralization and enhancement.
- Remove Personal Items: Pack away family photos, diplomas, collectibles, and personalized decor. These items, while meaningful to the seller, can distract buyers and prevent them from forming an emotional connection to the space.
- Declutter Surfaces: Clear off kitchen and bathroom countertops, nightstands, and coffee tables. Remove magnets from the refrigerator, put away small appliances, and hide toiletries. Clean, open surfaces make a room feel larger and more serene.
- Thin Out Furniture: A room with too much furniture can feel cramped and smaller than it is. Aim to remove 30-50% of the furniture to improve flow and highlight the room's actual dimensions.
Curate an Aspirational Lifestyle
Once the space is decluttered, the next step is to add thoughtful touches that create an inviting atmosphere and showcase the property's potential.
- Focus on Key Areas: Pay special attention to the living room, primary bedroom, and kitchen. These are the rooms where buyers make their most critical decisions.
- Add Strategic Decor: Introduce elements like fresh flowers, a bowl of fruit on the kitchen island, or new, fluffy towels in the bathroom. These small details add a touch of color and life without being personal.
- Ensure Impeccable Cleanliness: Every surface, from floors and baseboards to windows and light fixtures, must be spotless. A deep clean is a non-negotiable part of preparing a home for professional photos.
Pro Tip: Use neutral colors for bedding, towels, and throw pillows. A crisp, white duvet cover or light gray towels create a sophisticated, hotel-like feel that photographs beautifully and appeals to a wide range of tastes.
Effective preparation is the foundation of stunning real estate photography. Discovering exactly how to stage a house to sell can dramatically impact buyer perception and the final sale price.
4. Capture Compelling Property Overview and Curb Appeal Shots
The first impression is everything in real estate, and the exterior shot is the digital handshake that introduces a property to potential buyers. A captivating curb appeal photo sets the tone, showcasing the home's architecture, landscaping, and overall character. It is often the single most important image in a listing, determining whether a buyer clicks to see more or simply scrolls past.
Set the Stage for an Inviting Exterior
A great exterior shot begins long before you raise the camera. Proper preparation ensures the property looks its absolute best and removes any potential distractions.
- Declutter the Outdoors: Remove vehicles from the driveway and street in front of the house. Hide trash cans, garden hoses, toys, and any other personal items that detract from a clean, polished look.
- Perfect the Landscaping: Ensure the lawn is freshly mowed, hedges are trimmed, and flower beds are weeded. A well-maintained landscape signals a well-cared-for home.
- Clean Key Features: Make sure windows are clean and that the front porch and entryway are swept. These small details contribute to a pristine overall appearance.
Master Your Angles and Perspective
The position of your camera can dramatically alter how a home is perceived. The goal is to present a balanced, grand, and realistic view of the property.
- Shoot From Multiple Angles: Don't just take one photo from the center. Capture the full front elevation, shots from both sides angling toward the house, and a straight-on view from the street level to show how a buyer would approach it.
- Find the Right Height: Position your camera slightly above ground level, around 5-6 feet high. This perspective avoids distortion and presents the home in a way that feels natural and well-proportioned.
- Highlight Key Features: Take dedicated shots of unique architectural details, a beautiful front door, a charming patio, or other attractive outdoor amenities that add value and character.
Pro Tip: For a truly premium look, schedule your exterior shoot during the "golden hour" or at twilight. The soft, warm light minimizes harsh shadows and can create a dramatic, high-end feel, especially if the home has good exterior and landscape lighting. This is a simple but effective realty photography tip that elevates any listing.
5. Use Strategic Camera Angles and Positioning for Depth
Beyond just pointing and shooting, your camera's position fundamentally alters the perception of a space. Strategic angles and thoughtful positioning are realty photography tips that create depth, establish flow, and make rooms appear more spacious and engaging. A well-chosen viewpoint can transform a standard room into a compelling scene, guiding the buyer's eye and highlighting the home’s best architectural features.
Create Depth and Dimension
The goal is to move beyond flat, two-dimensional images and create a sense of being in the room. This involves thinking like an architectural photographer and using composition to your advantage.
- Corner-to-Corner Shots: The most effective and widely used technique is to position your camera in a corner, shooting towards the opposite corner. This approach captures the maximum amount of the room in a single frame, elongates the space, and creates strong diagonal lines that draw the viewer in.
- Shoot Through Doorways: Framing a shot from a hallway or an adjacent room through a doorway creates a natural frame and a sense of discovery. This technique, often seen in publications like Architectural Digest, establishes the relationship between spaces and illustrates the home's layout and flow.
Master Your Perspective
Maintaining a consistent and natural perspective is crucial for professional-looking photos that accurately represent the property.
- Maintain Eye-Level Height: Position your tripod so the camera lens is between 4.5 and 5.5 feet from the floor. This "chest height" perspective mimics how a person naturally views a space, preventing the distortion that comes from shooting too high (which makes furniture look small) or too low (which can feel unnatural).
- Use Asymmetrical Positioning: Avoid shooting straight-on into a flat wall, as this can make a room feel boxy and static. Instead, use asymmetrical positioning to create more dynamic and interesting sight lines that guide the viewer through the space and toward key features like a fireplace or a large window.
Pro Tip: Before setting up your tripod, walk the room and look through your camera from various corners and doorways. Pay attention to how foreground elements, like a chair or a lamp, can be used to add layers and a sense of depth to your composition.
6. Implement Professional Post-Processing and Color Correction
The camera captures the raw data, but professional post-processing is where a good photo transforms into an exceptional marketing asset. This crucial step refines the image, ensuring it accurately represents the property's best features while creating a polished, high-end look. Expert editing involves more than just a simple filter; it's a detailed process of color correction, exposure balancing, and enhancement that makes a listing stand out.
From Raw Image to Polished Result
The goal of post-processing is to make the photo look as natural and appealing as the human eye would perceive the space. This involves correcting technical imperfections and enhancing the visual story.
- White Balance Correction: This is the first and most critical step. It removes unrealistic color casts from artificial lighting, ensuring that whites are pure white and colors are true-to-life.
- Exposure and Contrast: This involves balancing the bright areas (like windows) with the darker areas (like corners). Techniques like HDR (High Dynamic Range) blending combine multiple exposures to create a single, perfectly lit image where every detail is visible.
- Lens and Perspective Correction: Wide-angle lenses, while necessary, can cause distortion. Post-processing corrects skewed vertical lines, making walls look straight and the room feel properly proportioned.
Tools and Techniques for a Professional Finish
Using the right software and techniques ensures consistency and quality across all your listing photos.
- Industry-Standard Software: Programs like Adobe Lightroom are the go-to for real estate photographers. Its powerful tools for batch editing allow you to apply consistent adjustments to an entire gallery, saving time and creating a cohesive look.
- Subtle Enhancements: The best editing is often unnoticeable. A light touch with tools like clarity, vibrance, and sharpening can make details pop without making the photo look fake or over-processed. Avoid oversaturating colors, which can misrepresent the property.
Pro Tip: Create a preset in your editing software with your standard adjustments for white balance, lens correction, and sharpening. This allows you to apply a consistent baseline to every photo from a shoot, dramatically speeding up your workflow.
Mastering these techniques is a key realty photography tip for producing magazine-quality images. Learning how to edit real estate photos effectively bridges the gap between a simple snapshot and a compelling visual that drives buyer interest.
7. Showcase Key Features and Focal Points Deliberately
Every property has a story, and its most compelling chapters are its unique selling points. Strategic photography doesn't just document a space; it directs the buyer's attention to the features that matter most. Deliberately showcasing key features like a renovated kitchen, a stunning view, or a cozy fireplace helps buyers emotionally connect with the property and justifies its value. This is a crucial realty photography tip for creating a persuasive visual narrative.
Identify and Isolate a Property's "Hero" Features
Before you even lift the camera, identify the elements that make the home special. These "hero" features are what buyers remember and what ultimately drives their decisions.
- Primary Selling Points: Kitchens and master bathrooms consistently rank as top priorities for buyers. Dedicate multiple shots to these areas, capturing them from different angles. Include wide shots to show the layout and detail shots to highlight high-end appliances, custom cabinetry, or luxurious finishes.
- Architectural and Unique Details: Don't overlook the character-defining elements. Capture built-in shelving, a grand fireplace, unique light fixtures, or elegant crown molding with deliberate framing. These details add perceived value and set the property apart.
- Outdoor and Lifestyle Features: A beautiful view, a sparkling pool, a landscaped patio, or a spacious backyard are powerful lifestyle magnets. Ensure these are photographed prominently, ideally during the golden hour, to evoke a sense of aspiration and desire.
Frame for Impact
Once you know what to highlight, use compositional techniques to make those features the undeniable star of the shot.
- Create a Focal Point: Use leading lines (like a pathway leading to the front door) or the rule of thirds to draw the viewer's eye directly to the feature. For example, place a stylish kitchen island at an intersection point in your grid.
- Use Lighting to Emphasize: A targeted burst of light from a flash or a well-timed shot with natural light can make textures pop. Use this to accentuate a stone fireplace, gleaming hardwood floors, or a granite countertop.
Pro Tip: Create a "detail shot" list for every property. Include close-ups of new hardware, high-end appliance brand names, unique tile work, or smart home features. These small shots reinforce the message of quality and care.
8. Invest in Quality Equipment and Technical Knowledge
While an agent's smartphone can take decent photos, professional-grade equipment is a non-negotiable for producing consistently stunning images that stop scrollers in their tracks. Investing in the right gear and the knowledge to use it effectively is a foundational realty photography tip that separates amateur snapshots from high-impact marketing assets. The right tools provide greater control, higher resolution, and the flexibility to adapt to any lighting challenge.
The Essential Real Estate Photography Toolkit
Building a professional kit doesn't require a Hollywood budget, but it does mean prioritizing a few key components that directly impact image quality.
- Camera Body: A full-frame DSLR or mirrorless camera is the industry standard. Models like the Canon 5D Mark IV or Sony a7 series offer superior low-light performance and dynamic range, capturing more detail in both the bright highlights of a window and the dark corners of a room.
- Wide-Angle Lens: This is the most critical lens for interior photography. A high-quality wide-angle lens, such as a 16-35mm or 17-40mm, allows you to capture the full scope of a room without the unnatural distortion seen in ultra-wide or fisheye lenses.
- Sturdy Tripod: A tripod is essential for ensuring every shot is perfectly level, sharp, and consistent. It eliminates camera shake, allowing for longer shutter speeds in low light and enabling advanced techniques like exposure bracketing for HDR images.
Mastering Your Camera's Manual Settings
Owning professional gear is only half the battle; knowing how to use it is what creates exceptional results. Understanding the exposure triangle (aperture, shutter speed, and ISO) is crucial.
- Aperture: Use an aperture between f/8 and f/11. This range provides a deep depth of field, ensuring that everything from the foreground furniture to the background details remains sharp and in focus.
- ISO: Keep your ISO as low as possible, ideally at 100 or 200. This minimizes digital noise or "grain," resulting in cleaner, crisper images. A tripod makes using a low ISO possible even in darker rooms.
- File Format: Always shoot in RAW format instead of JPEG. RAW files capture all the image data from the camera's sensor, providing maximum flexibility during post-processing to adjust exposure, white balance, and color with precision.
Pro Tip: Learn to use exposure bracketing. This technique involves taking multiple shots of the same scene at different exposure levels (one normal, one darker, one brighter). These images can then be blended together in post-processing to create a single, perfectly lit High Dynamic Range (HDR) photo.
9. Create a Comprehensive Photo Sequence and Narrative Flow
Effective real estate listings don’t rely on a random collection of individual photos; they tell a visual story through a carefully sequenced gallery. Creating a narrative flow guides potential buyers through the property logically, simulating an in-person tour. This sequencing is a powerful realty photography tip that helps buyers mentally place themselves within the home and understand its layout, which is crucial for building a connection.
Crafting a Logical Visual Journey
A well-ordered photo gallery prevents confusion and helps buyers appreciate how different spaces connect and relate to one another. The goal is to build a coherent and appealing narrative from the first image to the last.
- Start with the Approach: Always begin with a strong "hero shot" of the exterior and front yard. This first impression sets the stage and establishes the home's curb appeal.
- Move from Public to Private: Follow a natural progression. Start with the entryway, then move to the main public living areas like the living room, dining room, and kitchen. Afterward, showcase private spaces such as the primary bedroom, other bedrooms, and bathrooms.
- End with a Highlight: Conclude the sequence with the property's best secondary features. This could be a stunning backyard, a beautiful view from the deck, a finished basement, or a unique amenity that makes the home stand out.
Sequencing for Storytelling and Impact
The order of your photos directly influences how a buyer perceives the property's flow and functionality. A jumbled sequence can make a home feel disjointed and smaller than it actually is.
- Show Room Transitions: When possible, include photos that show the connection between rooms. For example, a shot from the living room looking into the dining area helps buyers understand the floor plan.
- Vary Your Shots: Within a single room, start with a wide shot that captures the entire space. Follow it with detail shots that highlight key features like a modern fireplace, high-end appliances, or custom built-ins.
- Finalize Before Uploading: Before uploading to the MLS, use a gallery tool or even a simple folder on your computer to arrange the images in their final order. Click through them one by one to ensure the "tour" feels smooth and logical.
Pro Tip: Aim for 25-30 photos for an average-sized home. Studies show listings in this range perform significantly better. This count provides enough images to create a comprehensive narrative without overwhelming the viewer.
10. Leverage Virtual Tours, Drone Photography, and Emerging Technologies
Static photos are essential, but modern real estate marketing now demands a more immersive and comprehensive visual experience. Technologies like 3D virtual tours, aerial drone photography, and video walkthroughs are no longer niche novelties; they are powerful tools for engaging buyers and differentiating your listings. Embracing these formats provides unparalleled context and a superior digital experience that static images alone cannot match.
Choose the Right Tech for the Right Property
Not every technology is suitable for every listing. Strategic application is key to maximizing impact without overwhelming buyers or your budget.
- Drone Photography: Ideal for properties with significant land, stunning views, unique rooflines, or desirable neighborhood features like proximity to parks or water. Drone shots provide a crucial perspective on the property's scale and setting.
- 3D Virtual Tours: A must-have for luxury listings, homes with unique layouts, or any property in a competitive market. Tools like Matterport or Zillow 3D Home allow buyers to virtually "walk through" the space 24/7, building a deeper connection.
- Video Walkthroughs: Perfect for social media engagement on platforms like Instagram Reels or TikTok. A short, dynamic video tour can capture the home's flow and atmosphere in a highly shareable format.
Best Practices for Implementation
Integrating new technologies requires a thoughtful workflow to ensure they enhance, rather than complicate, the marketing process.
- Integrate Seamlessly: Combine new tech with high-quality traditional photos. Your gallery should tell a complete story, using drone shots for context, interior stills for detail, and a virtual tour for an immersive experience.
- Prioritize Performance: Ensure your virtual tours and videos are optimized to load quickly, especially on mobile devices where most buyers begin their search. A slow-loading tour can lead to immediate frustration and abandonment.
- Focus on the Property: The technology should always serve to highlight the home's best features, not to distract with flashy effects. Keep camera movements smooth and the focus entirely on the property itself.
Pro Tip: As you incorporate more diverse media, an organized workflow is critical. Using platforms designed for uploading and managing your property photography assets can centralize your photos, videos, and 3D tours, streamlining the process from capture to listing.
By strategically incorporating these advanced visual tools, you provide buyers with a richer, more informative view of a property. Learn more about how to get the most from aerial photo real estate to give your listings a competitive edge and meet the expectations of today’s tech-savvy clients.
10-Point Realty Photography Tips Comparison
Transforming Your Listings with Modern Photography Strategies
The journey from a standard property listing to a compelling digital showcase is paved with intentional, high-quality visuals. Throughout this guide, we've explored a comprehensive suite of realty photography tips, moving from foundational principles to advanced technological applications. Mastering these techniques is no longer a luxury for top producers; it is an essential skill for any agent aiming to thrive in a competitive, visually-driven market. The difference between a home that lingers on the market and one that sparks a bidding war often begins with that first, crucial online impression.
Key Takeaways: From Fundamentals to Future-Forward Tactics
The ten strategies we've detailed provide a powerful roadmap. We started with the non-negotiables: optimizing natural light to create bright, inviting spaces and mastering the wide-angle lens without falling prey to distortion. We then moved to the art of presentation, emphasizing how strategic staging and decluttering can transform a space from lived-in to move-in ready. Capturing strong curb appeal shots and using thoughtful camera angles to convey depth and flow are critical for building a visual narrative that guides a potential buyer through the property.
At the core of these realty photography tips is the concept of deliberate storytelling. Each image should serve a purpose, highlighting a key feature, showcasing a unique selling point, or evoking a specific feeling about the home's lifestyle potential. This intentionality extends to your post-processing workflow, where professional color correction and enhancement turn good photos into great ones. Finally, embracing emerging technologies like drone photography, virtual tours, and AI-powered editing isn't just about staying current; it's about providing an immersive, comprehensive experience that sets your listings apart.
Your Action Plan for Photographic Excellence
Knowledge without action is merely potential. To truly transform your listings, you must implement these concepts consistently. Here is your actionable plan to get started:
- Audit Your Current Process: Review your last three listings. Where are the biggest opportunities for improvement based on the tips in this article? Is it lighting, composition, or post-processing?
- Create a Pre-Shoot Checklist: Before your next photoshoot, build a checklist covering everything from decluttering and staging to your shot list and camera settings. Preparation is the foundation of success.
- Experiment with One New Technique: Don't try to master everything at once. On your next shoot, focus on implementing one new skill, whether it's shooting from lower angles to create a sense of space or bracketing your exposures for better dynamic range.
- Explore Modern Workflow Tools: The traditional barriers of expensive equipment and time-consuming editing are rapidly disappearing. Investigate how AI-driven platforms can streamline your entire process, from photo capture to final delivery.
Ultimately, mastering these realty photography tips is an investment in your brand and your business. It demonstrates a commitment to excellence, providing immense value to your clients and positioning you as a premium agent. The skills you build will not only help you sell properties faster and for a higher price but will also become a cornerstone of your marketing strategy, attracting more sellers who want their homes presented in the best possible light. Your camera is one of the most powerful client-acquisition and sales tools you own; learning to wield it effectively is the key to unlocking your next level of success.
Ready to revolutionize your listing photography without the steep learning curve? Discover how Bounti Labs leverages AI to automatically extract, enhance, and even virtually stage stunning photos from a simple smartphone video. Visit Bounti Labs to see how you can achieve professional-grade results in minutes, not hours.